To adjust a semi-automatic label machine, you set the label gap and sensor first, then square the label path (unwind → peel plate → take-up), and finally fine-tune product guides and applicator pressure so the label meets the bottle at the correct tangent point. Lock all fasteners and re-test at working speed with 10–20 consecutive cycles.
Adjustment Workflow (What to change, in what order, and why)
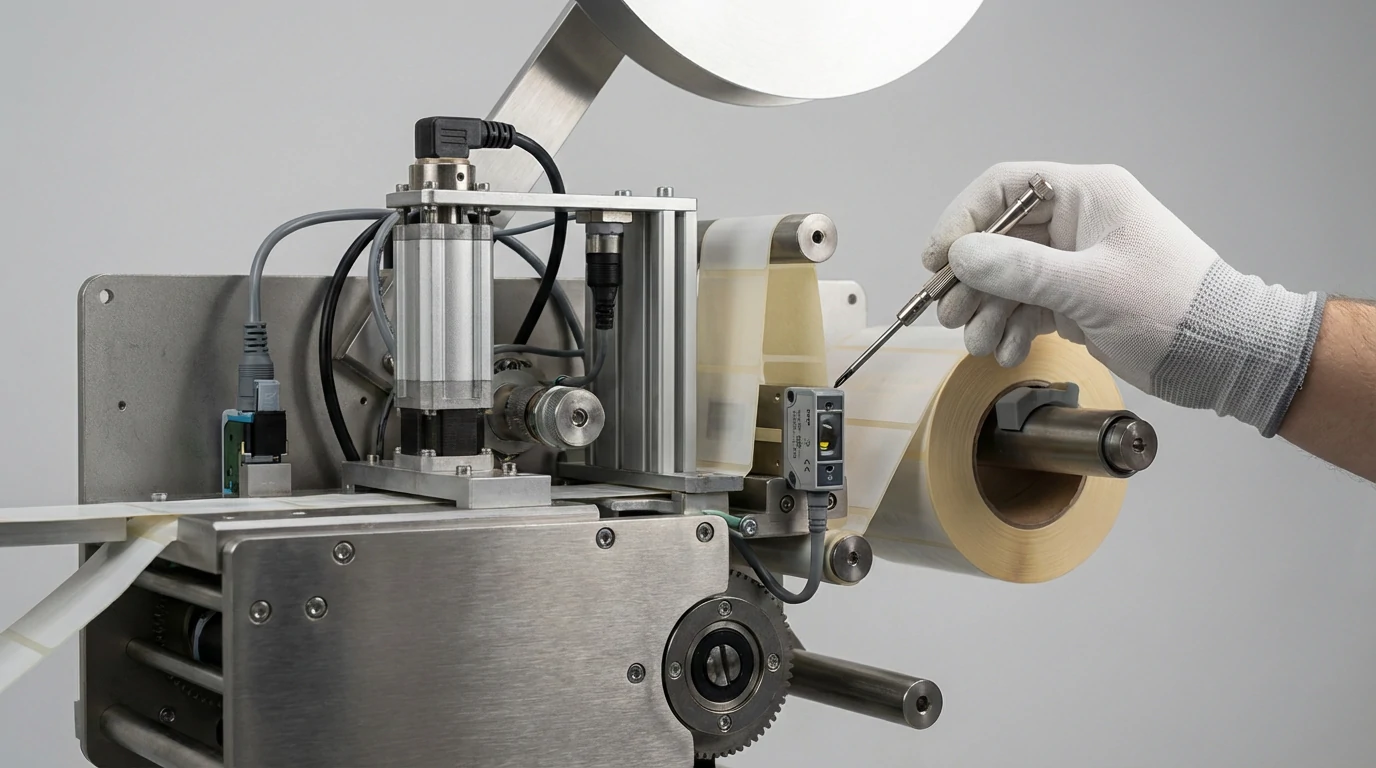
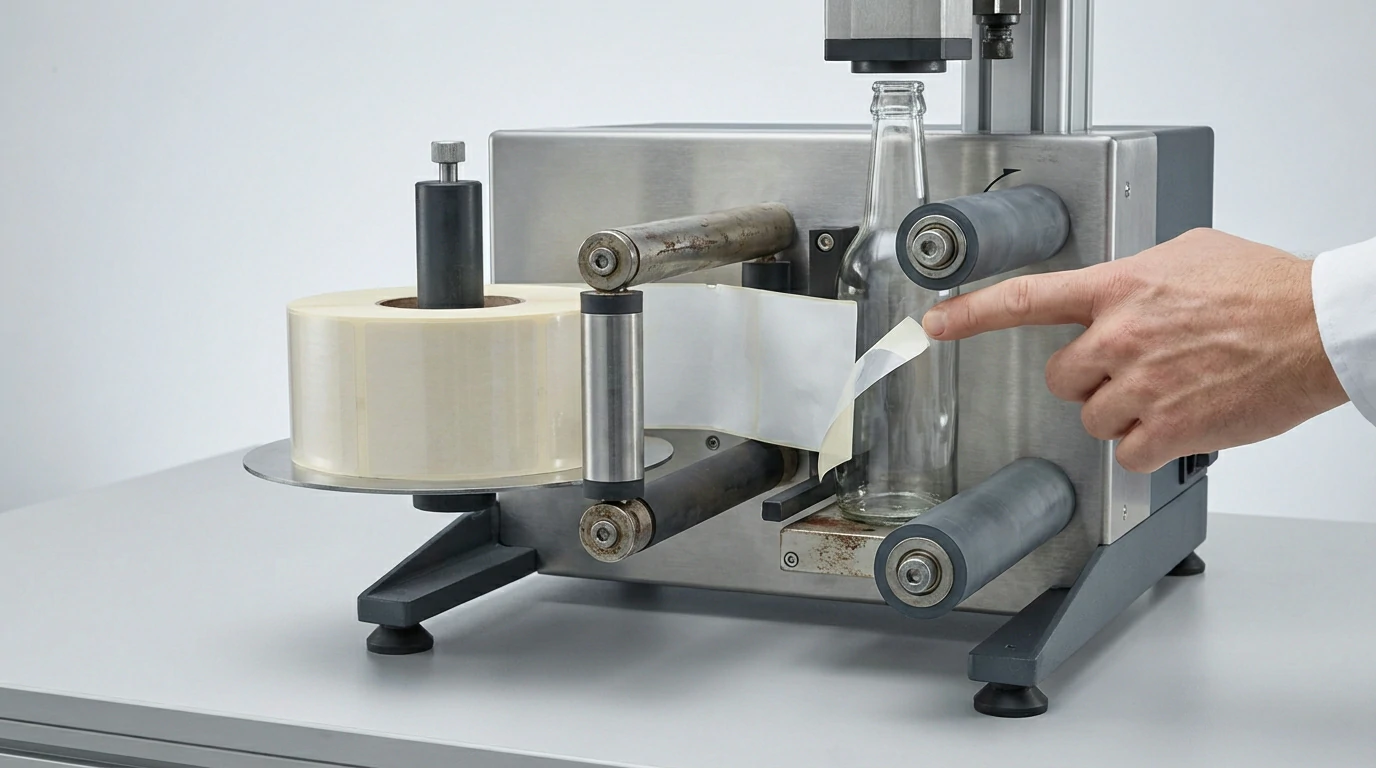
A semi-automatic label machine places a label by detecting the label gap (sensor), peeling the label off the liner at the peel plate, and transferring it to a rotating or indexed product. Accurate placement depends on repeatable product positioning and a stable label web path.
Recommended order of adjustments (fastest to stable)
- Mechanical baseline
- Tighten the peel plate, reel holders, and guide shafts.
- Confirm the peel plate edge is clean and not nicked.
- Label web path
- Center the liner through guides; remove side-to-side wander.
- Set take-up tension so the liner stays taut without “snatching.”
- Sensor calibration
- Teach the sensor the label and the gap (or reflective mark).
- Verify consistent detection at slow jog.
- Product positioning
- Set bottle stop/fixture position (label start point).
- Set side guides to prevent rotation slip or axial drift.
- Application geometry
- Align peel plate tangent to bottle surface.
- Adjust wipe roller/brush pressure so the label lays without wrinkles.
- Speed & repeatability
- Increase speed gradually; re-check for slip and sensor misses.
Quick troubleshooting map (symptom → likely adjustment)
| Symptom | Most common cause | What to adjust first |
|---|---|---|
| Label shifts forward/back randomly | Product slip or inconsistent stop | Tighten guides; increase bottle drive friction; verify stop position |
| Label consistently too early/late | Sensor trigger offset or stop position | Re-teach sensor; adjust trigger delay/position; move bottle stop |
| Wrinkles or bubbles | Excess wipe pressure or bad tangent | Reduce pressure; re-align peel plate angle; slow wipe contact |
| Skewed (top ahead of bottom) | Bottle not parallel to peel edge | Square product guides; check roller parallelism |
| Missing labels at higher speed | Sensor or tension instability | Increase liner tension slightly; stabilize guides; re-calibrate sensor |
AUTmachine Pro Tip: In our lab tests at AUTmachine, we found that 80% of “placement drift” complaints come from product handling, not the sensor—specifically a loose side guide or a bottle stop that flexes under rotation. We always lock the fixture first, then calibrate the sensor, then tune tension last.
How to calibrate a label sensor?
Calibrate the sensor by threading the label liner correctly, cleaning the sensor face, then teaching it the “label” and “gap” (or backing) states at slow speed. After calibration, run 10–20 cycles and confirm the sensor indicator switches at the same point each time without flicker.
Step-by-step sensor calibration (gap / transparent / reflective)
- Clean & inspect
- Wipe the sensor lens; remove adhesive dust.
- Correct threading
- Ensure the liner is flat and centered through the sensor fork/beam area.
- Teach the states
- Place label under the sensor → press TEACH/SET for “label.”
- Place gap/backing under the sensor → press TEACH/SET for “gap.”
- Verify stability
- Jog slowly and watch the sensor LED; it should switch cleanly once per label.
- Tune sensitivity (if available)
- Reduce sensitivity if it chatters; increase if it misses gaps.
AUTmachine Pro Tip: Our technicians often see “bad sensors” that are actually mis-threaded web paths—if the liner twists slightly, the gap signal becomes inconsistent. We always re-thread with the peel plate opened, then re-teach, then lock the guide collars.
How to set a label machine?
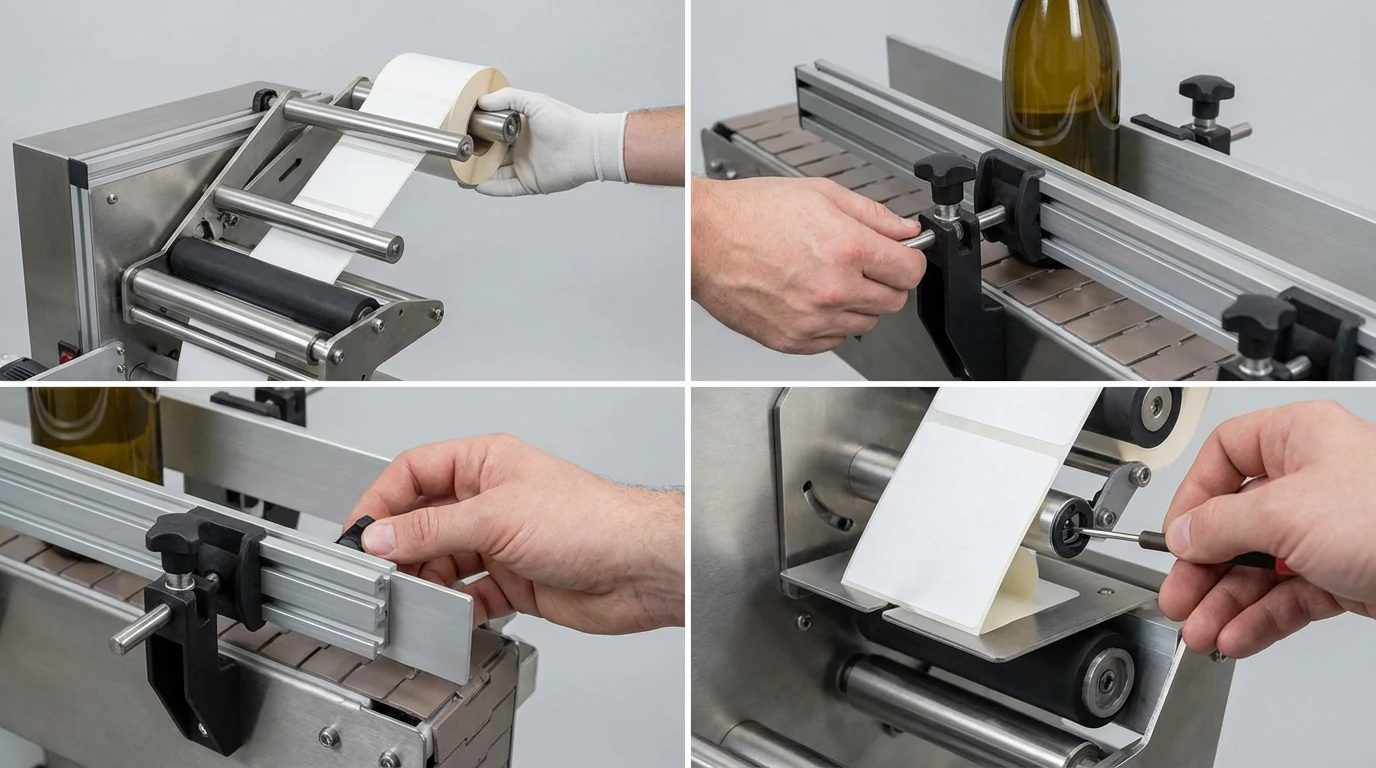
Set a semi-automatic label machine by loading the label roll, threading the liner to the take-up reel, aligning the peel plate and guides, calibrating the sensor, then adjusting the bottle stop and side guides to hit the target label start position. Confirm with trial runs and lock all adjusters before production.
Standard setup checklist (repeatable commissioning)
- Load materials
- Confirm label direction, core size, and unwind rotation.
- Thread & tension
- Thread to peel plate → take-up; set moderate tension (no slack, no jerks).
- Align
- Center label web; align peel edge square to product axis.
- Calibrate
- Teach sensor and verify detection.
- Position
- Set bottle stop (start point) and guide rails (prevent slip).
- Validate
- Run 10 samples; measure start position and skew; recheck at working speed.
AUTmachine Pro Tip: Our technicians often see faster changeovers when customers keep a “golden setup” sample: we record stop position, guide width, sensor sensitivity, and wipe pressure for each SKU. We recommend logging these values on a setup sheet next to the machine.
Why are my Labels not sticking to my bottles?
Labels usually fail to stick because of surface contamination (oil, dust, condensation), incompatible adhesive for the bottle material, too little wipe pressure/dwell time, or incorrect application temperature. Confirm the bottle is clean and dry, match adhesive to substrate, and adjust wipe pressure and speed so the label fully wets out.

Root-cause matrix (adhesive, surface, and machine)
| Cause category | Typical signs | Fix |
|---|---|---|
| Surface contamination | Edge lift, random failures | Improve cleaning; remove silicone/oil; avoid handling at label zone |
| Moisture/condensation | Milky bubbles, peeling | Dry bottles; control dew point; warm containers |
| Wrong adhesive/substrate | Whole label releases cleanly | Choose adhesive for PET/HDPE/glass; request liner/adhesive change |
| Not enough wipe/dwell | Bubbles, poor edge seal | Increase wipe pressure slightly; slow rotation; add second wipe pass |
| Over-tension/stretch | Shrink-back, edge lift | Reduce take-up tension; ensure smooth unwind |
AUTmachine Pro Tip: Our technicians often see “adhesive issues” that are really condensation—especially on chilled beverages. We measure bottle surface temperature vs. ambient dew point; if the bottle is below dew point, we fix the process (dry/warm) before touching machine settings.
What challenges might arise in accurately labeling auto components?
Auto components are hard to label accurately due to oily residues, varied geometries (curves, ribs, recesses), tight tolerance requirements, and higher traceability demands. Fixturing becomes critical: you must constrain part position repeatably, choose the correct tamp/wipe method, and validate label adhesion against heat, vibration, and chemicals.
Component-labeling challenges and engineering countermeasures
| Challenge | Why it causes mislabels | Engineering fix |
|---|---|---|
| Oil/coolant residue | Adhesion failure | Pre-clean or plasma/primer; choose aggressive adhesive |
| Irregular geometry | Wrinkles / bridging | Use conformable labels; add roller wipe; custom pad |
| Tight datum tolerance | Misplaced barcodes | Hard fixture datums; vision verification; poka-yoke loading |
| High throughput | Slip & timing drift | Servo-controlled feed; stable web tension; robust sensors |
| Harsh environment | Label degradation | Automotive-grade materials; chemical/heat resistant laminates |
AUTmachine Pro Tip: Our technicians often see accuracy issues disappear once we add a datum-based fixture (two hard locators + one clamp) instead of relying on hand placement. We design fixtures so the part always references the same surfaces, then we tune the label start from that datum.
What’s your recommended process to adjust a semi-automatic label machine for different label sizes and positions?
For different label sizes, adjust in this order: change roll and re-thread, re-center guides, recalibrate the sensor for the new gap/opacity, then reposition the peel plate and product stop to match the new label start. Finally, tune wipe pressure and take-up tension to prevent skew and wrinkles.
Changeover process (label size/position) — recommended sequence
- Swap consumables
- Install new roll; confirm unwind direction and core fit.
- Re-thread & re-center
- Center liner through guides; keep liner flat.
- Re-calibrate sensor
- Teach label/gap again (do not reuse old sensitivity blindly).
- Set label position
- Adjust bottle stop (start point) and guide rails (rotation stability).
- Fine tune
- Wipe pressure, peel angle, take-up tension.
- Validate
- 10 slow samples → 10 at production speed; record final settings.
AUTmachine Pro Tip: Our technicians often see changeovers fail because only the stop is moved, but the peel plate remains at the old tangent point. We always reposition the peel edge relative to the bottle diameter first, then set the stop for the exact start location.
How do you adjust a semi-automatic label machine to maintain accurate label placement at higher speeds?
To keep placement accurate at higher speeds, stabilize the web path (tension and guides), reduce product slip (better grip/fixture), and confirm the sensor signal remains clean without flicker. Increase speed gradually while monitoring skew and start-point drift, then lock settings and re-check after 30–50 cycles.
High-speed stability tuning (what actually changes with speed)
- Web tension
- Increase slightly to remove slack; avoid over-tension that stretches liner.
- Guide rigidity
- Minimize free play; keep liner centered to prevent lateral wander.
- Sensor reliability
- Re-check teach/sensitivity; ensure the gap signal is stable at speed.
- Product traction
- Increase drive roller friction or clamp force; prevent micro-slip.
- Wipe dynamics
- Reduce excessive pressure; ensure smooth contact time (no bouncing).
AUTmachine Pro Tip: Our technicians often see high-speed drift caused by liner “snap” on take-up. We add just enough take-up torque to keep the liner taut and ensure the rewind is smooth; if the liner jerks, the label peels inconsistently and placement shifts.
Conversion: When semi-auto limits your throughput
If you’re scaling beyond manual loading constraints or need consistent verification, consider our automatic labeling machine solutions for higher-speed, higher-repeatability labeling with production-grade guarding and integration options.
Conclusion
A semi-automatic label machine adjusts best when you lock mechanics first, calibrate the sensor second, and only then fine-tune product handling and tension for stable placement across speed changes.
FAQ
A: Ensure the container guides are firmly locked and the label stripping plate is perfectly parallel to the product roller.
A: Re-calibrate the label sensor sensitivity to ensure it correctly detects the gap between labels
A: Use the adjustment knobs or screws to move the labeling head or the bottle support tray up, down, left, or right.
A: Check if the label stripping plate is sharp enough and ensure the label roll is threaded tightly through the tension rollers.
A: Manually move the side guides and adjust the roller distance to match the width and curvature of the new bottle.
A: Increase the pressure of the sponge roller or labeling brush to ensure the label is pressed firmly against the container during application.